How to Start Homesteading Right Where You Are

I’ve had this conversation a lot with people who want to get started in homesteading but feel stuck. They have starry eyes but don’t have the ability to buy expanses of land and quit their job. Or don’t have the know-how to even be successful at something like that. But something in them yearns for a simpler, slower paced life full of baskets of ripe blackberries on the counter, stew simmering on a woodstove and bucolic green hills dotted with grazing sheep.

We get it, boy do we ever get it. I met Luke when he was only 19 years old and his eyes would light up when he would talk about the future, which of course involved us owning our own ranch and lots and lots and lots of cows. It’s been a slow process for us to get where we are now, involving buying and improving 2 houses in a hot housing market and very slowly building our farm and skills with the small amounts of money we could spare. It also included a lifetime of knowledge from Luke and me learning alongside him, often just following him around with a baby in my arms while he worked.

But for those of you who want to work towards the goal of being more self sufficient, of getting the satisfaction of producing tangible things yourself, of eating a meal you grew and cooked, I want to help you get started. And once you get started you’ll find ways grow and expand. Or stay small if that is what you want. There’s no one size fits all with homesteading.

The very first thing you should do is obviously….buy a milk cow. (Ha! Kidding! Don’t do that!) No, the first thing you need to do is deceptively simple, Start Cooking From Scratch! And when I say learn to cook from scratch I mean like for real you guys, like how great-grandma did it. Some good places to start are cooking meat, making broth from bones, making lard instead of using unhealthy oils (I have pork fat for lard and beef fat for tallow I can add to your meat boxes, just let me know you want some), cooking eggs various ways, making yogurt, butter and soft cheeses, etc. The reason this is where you need to start is because of course if you are producing food you need to know how to cook it! If you start producing the food (and all the work that goes along with that) and are trying to learn to cook alongside that it’s going to become very overwhelming.

The next step is to Learn to Can and Start Buying In Bulk. Once you have the cooking down you can start to buy larger amount of food at a time from farmers. Buy several boxes of tomatoes at the farmer’s market and can them. Get staples like flour or honey or mineral salt in larger amounts to save money (and put towards your homesteading endeavors!). Go pick apples at an orchard and can applesauce and make pies. Buy a quarter beef and practice cooking all the different cuts. This is your test run of how to handle all of that bounty when it arrives.

The next step is to Adopt the Right Mindset. This, like all of the previous suggestions, is an ongoing process. Something to consider is homesteading takes a lot of self-sacrifice. Living within your means and eliminating debt are important to success. It can also look like worn boots and a dated bathroom. Resisting looking at “farmhouses” on Instagram can help you be content with humble (and financially stable) beginnings. Learning how to make do and make something out of nothing are essential skills for this kind of life. It also helps to work on a mindset of abundance rather than scarcity because there can be a lot of risk in trying to make a homestead support your family. One way I like to remind myself of this is to saunter around outside for a while because nature is overflowing with abundance. It’s impossible to count the stars or the blades of grass or the drops of water in the creek or the leaves on the trees or the snowflakes falling from the sky.

Ok, you can REALLY do it now. Get Started With Some Small Projects. SMALLER than perhaps you think you can and not creating financial strain over it is important. Keep in mind that it usually costs more money to produce something well yourself than to grab it at the grocery store, especially when you are just getting started with supplies and materials. Some good starting projects could be:

  • A pot of herbs on your windowsill or front step

  • A bush tomato plant in a pot

  • Make sourdough bread

  • Make candles or soap

  • A 4 ft x 4ft raised vegetable garden

  • Laying hens

  • Fruit trees

  • Berry bushes

  • Beehives

  • Tap trees for maple syrup

  • Meat chickens raised on your grass and butchered yourself or taken to a butcher

  • Learn to sew, knit, crochet

  • Learn home maintenance and repair

  • Install a woodstove and chop your own wood

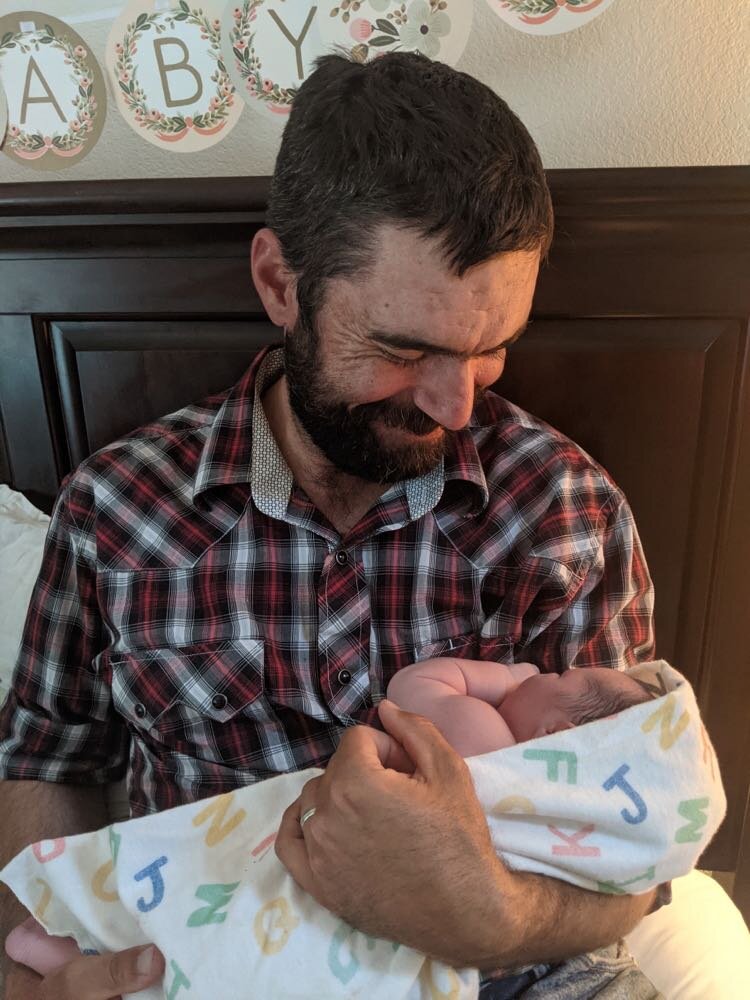
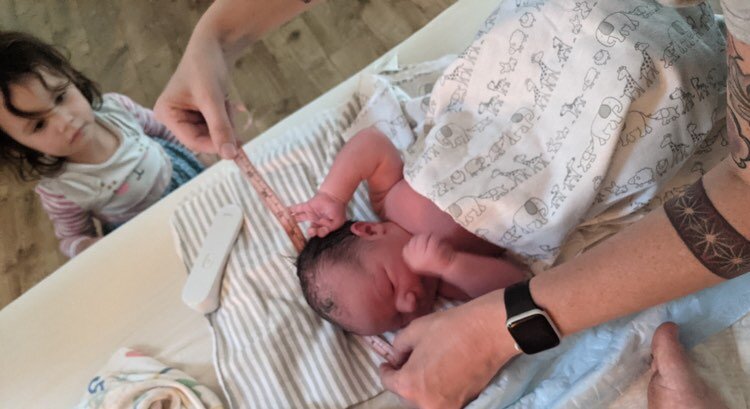
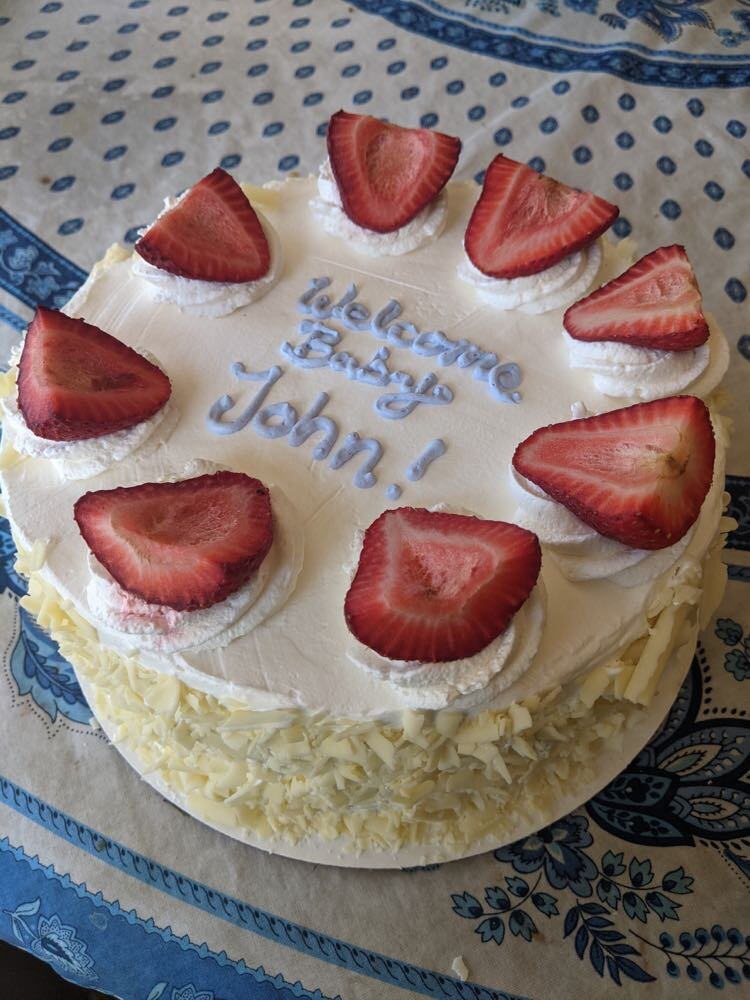
In farm news we have our first farm babies of the year, twin girl lambs! Our wonderful neighbor Jessie made lambie jammies for them (and all the rest that are on the way) to help keep them warm. I know, way too cute! And here we are staying warm this winter with basketball and snuggling John and baby goats by the wood stove.

Recipe: Queso Chicken Wild Rice Soup

Our family loves soup and we make it all the time in the winter months! I rarely follow recipes so it’s different every time but I wrote down how I made this soup and then got the approval of the official Thompson test team. Some got third bowls, so three thumbs up! I used what I had on hand at the moment but this would also be great with carrots, celery and mushrooms or with jalapenos or also made as a broccoli cheddar soup. Or corn to make it into a corn chowder. Using homemade bone broth is what takes this to the next level but you could use some from the store if that’s what you have. This ended up making approximately 6 qts of soup and fed our family for 2 meals.

Ingredients

  • 1 Stick of Butter

  • 1 Onion, Diced

  • 2 Garlic Cloves, Minced

  • 1 Bag (28 oz) Frozen Southern Style Potatoes with Onions and Peppers

  • 8 cups Chicken Bone Broth

  • 5 cups Whole Milk

  • 1 cup Flour

  • 1 tbsp Salt (if your broth isn’t salted already)

  • 4 cups Cubed Chicken, already cooked

  • 4 cups Shredded Cheese (I used sharp white cheddar)

  • 2 cups Wild Rice, already cooked (this is less than a cup uncooked)

  • 1/4 tsp Cayenne Pepper

  • Black Pepper to taste

Method

  1. Cook the wild rice per directions in a separate pot

  2. In an 8 qt pot melt butter and soften onions and garlic in it.

  3. Add bag of potatoes, still frozen.

  4. Add chicken broth and bring to a simmer

  5. In a separate bowl, whisk flour into cold milk.

  6. Add milk/flour to soup when potatoes are soft.

  7. Add salt, chicken, cheese, rice, cayenne pepper and black pepper and heat until gently simmering. Delicious served with sourdough bread with a Great Deal of Butter!

We're Making Ordering Meat Easier

We are so excited to finally make it easier for you to sign up for subscription boxes or order a one-time box!

We have 3 size options to choose from. The small and medium subscriptions will not get a box every month but to help you keep your food costs more constant, you will automatically get billed a smaller amount monthly.

To help us lower our shipping costs, we are now packing boxes closer to the 50 lb max weight to lower our shipping price per pound. We just heard from the grain mill that they are raising the price of our poultry and pig feed this year so saving on shipping costs a bit will help with that. You might have to cut the box open on your step and carry some of the meat in to make it lighter. Sorry…not meaning to insult your bicep game, haha! We recommend having a second freezer or a nearly empty attached-to-the-fridge freezer to fit the meat, the meat will take up about 2 cubic feet.

We are hoping to keep producing a little more every year, but for this year we will only have enough pork to include in the subscription boxes. Like we’ve done in the past, we will save back enough meat to cover all of our members through the year. If you’d like a one-time box we have beef for you and will have turkeys in November.

As always we appreciate your support so much, we couldn’t do it without you!

Go Here to sign up to receive your first subscription box this month!

In other news, January has gotten cold here in Wisconsin! Here’s Luke on one of our colder mornings, -11 degrees! And as Lucy says, with “bicycles” on his beard! We have kind of gotten used to it actually and the kids are having a blast with the snow that stays and our great sledding hills!

Thompson Babies and Dutch Babies

As my due date got closer (and I became more impatient) I decided to pray the surrender novena which takes 9 days to complete. I was hesitant to start it and told Luke that I probably would stay pregnant until I finished it and he laughed and said God doesn’t work that way…..fast forward 9 days later and I’m still pregnant. Haha! We prayed all the novena prayers together that morning and when we finished I had a huge contraction! Which was unusual, I had been having contractions for about a month but not until afternoon and evening. I went about my day and at 4:30pm I started having contractions fairly regularly but I had kind of gotten used to them and wasn’t sure it was anything. At 5pm we called the midwife and I was worried she would make the trip over for nothing. Because I was pretty sure at 4 days over my due date I was just going to be pregnant forever, haha!

I got dressed in my swimsuit cover, because I planned to have a waterbirth, and the midwife arrived at 5:30. She began the process of bringing all of her things in and listened to John’s heartbeat. I was standing as she checked him and I started to shake as I tried to stand still. That was the first moment I was “pretty sure'“ this baby “might” actually come. I asked if we should get the tub set up and the midwife gave me an “oh sweetie” smile and said we wouldn’t have time. As the midwife bustled around and my 3 big girls bounced around with chicken strips in their hands and asked if the baby was really, REALLY coming I said that I was starting to feel pressure. I began to lean my forearms on the side of the bed during contractions (which almost didn’t stop in between) and make my “humming moan” sound which makes Luke like to declare, “I know what THAT means!”. I started to feel like I couldn’t stand anymore and climbed on the bed and began pushing. The “humming moan” evolved into screaming and the midwife exclaimed “My goodness! He has SO much hair!” and later told me she wanted to say, “Holy smokes his head is huge!” but didn’t want to discourage me, haha!

So 6 minutes after I started feeling pressure and at exactly 6pm (6pm and 40 seconds according to Hannah with the super official clock) our sweet baby boy was born! June 3rd, 9lbs 3oz and 21 1/2” long with a 15” head (that’s as big as they come!). We named him John Basil and he was our first baby born at home, our first to go over due date and definitely our biggest baby! Luke got to catch him and Hannah cut the cord and it was the best birthing experience I’ve ever had!.

So for that big head to squeeze through his face got a little smooshed and he ended up having some swelling that made his jaw tight. It turned into a really hard start to nursing with even his biggest and best latch giving me scabs that felt like being stabbed with needles as he nursed. I am so grateful my midwife continued to check us at the house daily and had her lactation consultant come see me and help me with exercises to loosen his jaw and positions that would be the least painful as I healed. As this was all happening we were preparing to move cross-country! Luckily I didn’t get sick with mastitis, though I felt I was off and on battling to not get it even after we moved to Wisconsin. Now 2 months later I think we’re finally out of the woods (though literally much more in the woods, ha!) and happily breastfeeding.

226291736_4197829340313468_4331030871518873871_n.jpg

So as crazy busy as this has all been we are enjoying Wisconsin so much! Everything is SO green, the trees sparkle with fireflies at night, the people are so friendly. And the moisture has been great for my skin! Our house and property are still kind of a mess but our friends sent their 2 teenage sons to help us for almost a month which made a HUGE difference! We have our animals all situated now. We brought cows, sheep and goats with us and got pigs, chickens, turkeys and 2 barn cats here in Wisconsin. Here’s a few pictures of our new place:

224208281_2881829681978019_6500017016059381120_n.jpg

We started this post with baby pictures and now we’ll finish with them….Dutch baby pictures! Our family loves to make these. They are very quick to make and cook in the oven while you make other things on the stove and make it feel like a holiday. Throw in berries or softened apples if you want. Make sure that everyone is assembled when you are ready to take it out of the oven because it will be SUPER poufy and everyone will cheer and it will fairly quickly deflate so don’t miss it! We make it in a cast iron skillet and cut it like pie pieces but you can make this in a pan too. Size isn’t too important as long as you are ok with it puffing bigger or smaller. We double this recipe for a 14 inch skillet (and it kind of puffs more than it’s supposed to) but it should be about perfect for a 10 inch.

Dutch Baby Pancake

Makes one 10” skillet

Ingredients:

1/2 cup all purpose flour

1/2 cup whole milk

2 large eggs

2 tbsp sugar

1 tsp vanilla extract

1/2 tsp salt

2 tbsp butter

Berries or softened apples (optional)

Powdered sugar and maple syrup to top

Method:

  1. Preheat the oven to 425 degrees

  2. Warm the skillet in the oven for about 10 minutes

  3. Mix all ingredients together except the butter.

  4. Remove the skillet from the oven and melt the butter in it. (Add apples now if desired)

  5. Pour the batter into the skillet (add berries now if desired) and put in the oven.

  6. Bake until puffed and lightly browned, about 15-20 minutes. With our bigger skillet it takes closer to 30 minutes.

  7. Remove from oven (with mandatory clapping and cheering) and dust with powdered sugar. Serve with maple syrup, jam or fresh berries. Pairs wonderfully with bacon (but doesn’t everything?).

How to Love Winter

Complaining about the weather has always been a popular (and easy) topic and winter tends to get the worst of it. But I’m here to tell you why I love winter and how you can enjoy it too.

Katie St Lucy's Day.jpg

1. Practice Being in Sync with the Seasons

Being involved in farming, ranching, gardening and homesteading has brought me a new appreciation and understanding for the rhythm of the seasons and how, if we follow their lead, we are much happier in our lives. The frozen land doesn’t allow us to do much and after the work of bringing in the harvest in the fall we quite frankly don’t WANT to do much more. You don’t need to have a farm to practice this though, winter naturally makes us want to slow down, get more sleep and rest our bodies. Try not to plan too much and have quiet evenings. Luke is just starting up with reading to the kids next to the fire before bed again, something the kids have been anticipating with great excitement. Even from a young age they have noticed that “summer dad” flops onto the couch when he gets home late at night but “winter dad” has a twinkle in his eyes and likes wrestling, playing silly songs on the guitar, reading and long talks before bedtime. It gets dark at 5pm and not much can be done outside so winter forces him to get more rest.

2. Find Ways to Be Creative

Because nature isn’t creating much for us to appreciate except for snow, we need to find ways to express our creativity if we are to feel like we are still growing, learning and being productive. A bonus is it’s hard to have winter blues when you are working on a project or learning how to do something new. Writing, knitting, cooking (soups and stews are especially cozy), baking, practicing musical instruments, sewing, drawing, and woodworking are just a few of all the ways we can create things in the winter.

3. Bring Light Into Your Home

Finding a way to safely have fire in your home makes winter feel cozy. Our wood burning fireplace is one of my favorite things about winter but also adding candles and Christmas lights make the longer nights not feel so gloomy.

4. Become Comfortable With Being Uncomfortable

One of the biggest complaints about winter is feeling cold. Dressing appropriately will obviously help with that but after being outside we often just feel cold no matter what we do. I am trying to practice being more ok with that and have found that always being comfortable in life can actually lead to a bit of numbness and boredom. We won’t find nearly the pleasure in a hot bath, a blazing fire, or a cup of hot tea if we never got cold in the first place. Just as a fan and icy drink are the most wonderful things in the world in August and a hearty, homemade meal is incredible when you have spent a few hours feeling hungry. Allow yourself to feel uncomfortable and you might just find you finally feel fully alive and can appreciate the blessings you have in a new way.

Make Rich and Creamy Hot-Chocolate From Scratch

We had our first snow on Sunday so we had to warm up with some hot chocolate! This hot chocolate tastes amazing and allows you to use higher quality ingredients than the cocoa packets. You also avoid unpronounceable ingredients and corn syrup (which is in stinking everything!). I usually just make this when we have a “let’s go play in it” amount of snow because I tend to practice self-control by drinking 3 mugs of it!

PXL_20201108_182357744.jpg

Rich and Creamy Hot Chocolate

Serves 4

Ingredients:

  • 1/3 cup unsweetened hot cocoa (Costco has an organic, fair trade one that tastes great and is a great price)

  • 3/4 cup white sugar (I prefer organic cane sugar)

  • 1/8 tsp salt

  • 1/3 cup boiling water

  • 3 1/2 cups whole milk

  • 1/2 cup half and half cream

  • 3/4 tsp vanilla extract

Method:

Combine the cocoa, sugar and pinch of salt in a saucepan. Whisk in the boiling water. Simmer this mixture over low heat for about 2 minutes stirring constantly and being careful not to scorch it. Stir in milk and cream and heat until hot but not boiling. Remove from heat and add vanilla. It’s fun to top with whipped cream or marshmallows!